"Kawaii" is the Japanese word for "cute." Think Hello Kitty and other Sanrio characters. I like the “kawaii” style because of the big bold outlines of the images. This makes details stand out at a distance. A core element of using this style for the flannelboard is using the background color of your felt piece as the negative space between the other pieces.
I have a red flannel board at my library so I use a black felt background for my pieces to make them pop. If your board is black, try using a white or other light colored background.
Here follows a jaunty walk through
the making of a kawaii felty thing.
Click here for info on felt, scissors and glue!
the making of a kawaii felty thing.
Click here for info on felt, scissors and glue!
Say you wanted to make a lamb for the "Mary Had a Little Lamb" rhyme. To find an image, Google “kawaii lamb.”
Definitely keep Safe Search on!
Consider yourself warned!
Definitely keep Safe Search on!
Consider yourself warned!
Adding “simple coloring page”or “cute” with your search term can also provide simple drawings with large borders. Then adding your own kawaii happy face really brings the image to life.
Like this
or this.
Like this
or this.
So, google “Kawaii lamb.” After scanning images you decide a baby alpaca would be cuter. Find something you like and copy the image into Microsoft Publisher or whatever favorite photo editor. Now adjust it to the size you want for your pattern.
If you want to get real fancy, combine images.
If you want to get real fancy, combine images.
Note: Larger sized pieces are easier to make than small ones. Make them as big as your flannelboard will allow. Plus they will be more visible. For reals!
Print out a copy on regular printer paper.
This image was initially really small. It became pixelated and blurry when enlarged.
Emboldening the borders with a Sharpie helps guide your cutting.
Nice and darkened thick borders.
Take that image and cut around the outside border, leaving a little white space.
Tape the image directly on to your black felt.
Now, using sharp fabric scissors, cut along the outside edge of the outline of your image.
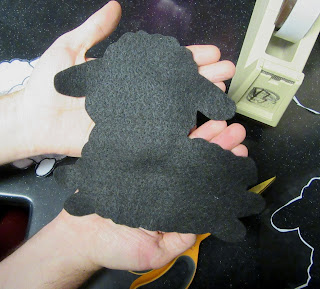
You now have the background upon which you will glue the other pieces.
Baa Baa Black Background!
Now cut out the pattern pieces you will tape to your top layer colors.
Cut out and ready to tape! Wait to do the face shape until after cutting the body layer.
Tape them on the desired colors of felt.
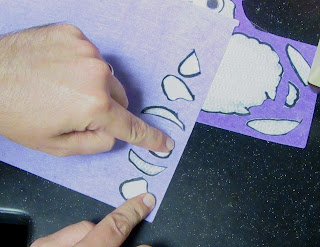
Cut out, now on the inside of your black border line.
These pieces are ready. Now you can cut out the inner pieces from the same paper pattern.
Cutting out the face after taping it down.
Now it just needs eyes and a mouth. In this case, use the same face as the original image.
Adding faces to any inanimate objects can make them way cuter. Sort of like Shopkins...if those weren't quite so horrifying. Google “Kawaii face” for ideas on eye and mouth placement. I typically cut a circle in half for the mouth and use a wide eye placement. Experiment with all different placements for different effects!
Adding faces to any inanimate objects can make them way cuter. Sort of like Shopkins...if those weren't quite so horrifying. Google “Kawaii face” for ideas on eye and mouth placement. I typically cut a circle in half for the mouth and use a wide eye placement. Experiment with all different placements for different effects!
Small detail pieces can be tricky. I often use stiffened felt because it is easier to cut.
Use the same process: cutting patterns, taping them down and then cutting the felt. Sometimes it takes a few attempts to get them right.
Very careful...
Making the small circles is difficult. While it is possible to do by hand, I prefer to use a diecut machine and various dies which contain circle patterns. The diecut will cut easily through two layers of felt. Roller die machines work way better than press machines.
After all the pieces are laid out, you are ready to glue.
Best glue evah!
Hold down one edge while applying glue to the back side of the opposite end of the piece.
All glued and ready for the flannel board!
Yay, it is ready for storytime. Wait...this lamb is most definitely not white as snow. Uhhh...
"Mary had a little alpaca, little alpaca, little alpaca,
Mary had a little alpaca, with a purple glow..."
OK maybe not, but it sure is cute, though!!!
OK maybe not, but it sure is cute, though!!!


Great tutorial Keith. I HIGHLY recommend these scissors: https://smile.amazon.com/Fiskars-Softouch-Scissors-1-75-Inch-99217097/dp/B00007M9MM/ref=sr_1_5?ie=UTF8&qid=1474583027&sr=8-5&keywords=fiskars+spring+loaded+scissors They are small, sharp and spring loaded, which means you will have NO muscle fatigue in your hands, and they can do the tiny pieces so much more easily. I love them and there are coupons and sales for 40% off at Joanne all the time.
ReplyDeleteHey! Your opinion is especially weighty since I'm an admirer of your sets. I always point people to your Etsy store ( https://www.etsy.com/shop/FlannelBoardFun ) when they want to buy my stuff. And your prices are so cheap considering the high quality!
DeleteI'll def add those scissors to my repertoire.
Just fainted. Thank you!!! And again!!
DeleteIf you don't have these scissors you don't know what you're missing - they come in several different sizes and are the bomb for cutting out small pieces and intricate things.
Deletehttps://www.amazon.com/Karen-Kay-Buckley-52444-Scissors/dp/B00E4RDIP4/ref=sr_1_1?ie=UTF8&qid=1521738883&sr=8-1&keywords=kay+buckley+scissors
You are super super awesome and I just read everything on your blog.
ReplyDeleteI am flattered and glad you like my blog! :)
DeleteI want to thank you for the inspiration and tutorial! I use slightly different methods (I like to use a light board to trace out pattern shapes) but I don't think I would have thought to tape down the pattern pieces, which works brilliantly! Also, you are correct, that glue is the best glue evah! I've gone ridiculously overboard in making felt pieces for a superhero themed storytime, and I entirely blame you and your cute flannelboards!
ReplyDeleteI've made Batgirl: https://scontent.xx.fbcdn.net/v/t31.0-8/15774680_1419768041397616_5635616689723916797_o.jpg?oh=1a2f2a95dc3c572916f2311dd45e38a3&oe=5922E742
And Storm: https://scontent.xx.fbcdn.net/v/t31.0-8/15776895_1419768034730950_641391668106586421_o.jpg?oh=fbe57667c54eef9475258f08dde7565a&oe=591B6814
And I have Wonder Woman in the works. I suspect that most of my freetime will now be spent cutting out felt. I might start a storytime blog soon too to show off some of them more!
Your Kawaii tutorial is fantastic and I love learning new crafts! The Kawaii pieces you have introduced to Toddler Time at the library are visual masterpieces for the little ones, along with your singing and dancing!
ReplyDeleteAdorable figures
ReplyDeleteThanks for the tutorial! We miss you since we've moved to Gastonia, but I've taken up felting and when I use felt figures at our new preschool my son says I'm "being Mr. Keith."
ReplyDeleteFantastic flannels! Everyone loves them. Thank you for showing me how to make them.
ReplyDeleteFarida
Nice Work Kawaii Face
ReplyDelete